Capturing the perfect screen shot on your iPad can be an art form. Whether you want to save recipes or details from your favorite apps, a well-timed screenshot immortalizes the images and information shown on your screen. But what's the best method for that one-handed screenshot when your iPad doesn't have a Home button?
Read on to master the techniques on how to take screenshots on any iPad model. We'll cover everything from Quick Action buttons to Apple Pencil gestures to bring some magic to your iPad screenshots.
How to Screenshot on iPad With Home Button?
Whether you want to save a recipe, directions, a picture, or even just remember something you saw, taking a screenshot is an easy way to quickly capture any content viewed on your iPad. The best part is that you don't need any special apps or tools. Every iPad model with a home button has the screenshot feature built right in.
Steps
- Go to the screen you want to capture a screenshot of. This could be a webpage, app, photo, or any other content.
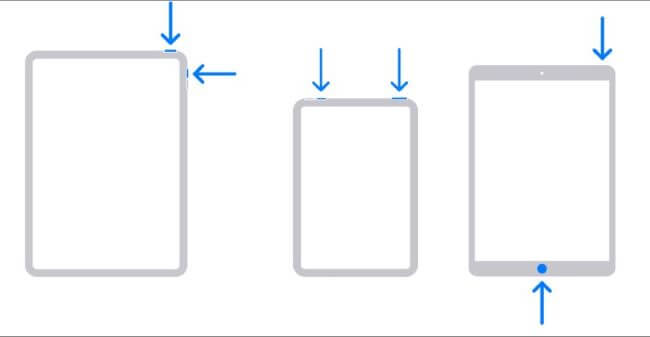
- Simultaneously press the Power button (located on the top right edge of your iPad) and the round Home button on the front bottom center of your screen.
- Quickly release both buttons once you see a flash on your screen. This flash indicates the screenshot has been captured.
- Find your screenshot saved in the Photos app under the Screenshots album.
How to Screenshot on iPad Without Home Button?
Whether you find a recipe worth keeping, want to remember a picture, or just capture something interesting online, screenshots are an easy way to save content from your iPad. If your iPad has an edge-to-edge display without a home button, like the iPad Pro, iPad Air, or latest iPad Mini, you can still take screenshots using the device's other built-in buttons.
Steps
- Go to the screen showing the content you want to capture a screenshot of. This could be an app, website, document, or anything else.
- Press the Power button on the top right edge and either Volume button on the left side simultaneously.
- Your screen will briefly flash when the screenshot is captured. A thumbnail preview will also appear.
- Find your screenshot saved in the Photos app under the Screenshots album. Tap the preview thumbnail if you want to edit or draw on your screenshot before saving.
How to Screenshot On iPad Using AssistiveTouch?
When the physical buttons on your iPad aren't working properly, taking a screenshot can seem impossible. However, the AssistiveTouch tool gives you an on-screen home button to work around issues with broken buttons. By customizing it to add screenshot capabilities, you can save iPad screen content as images again.
Steps
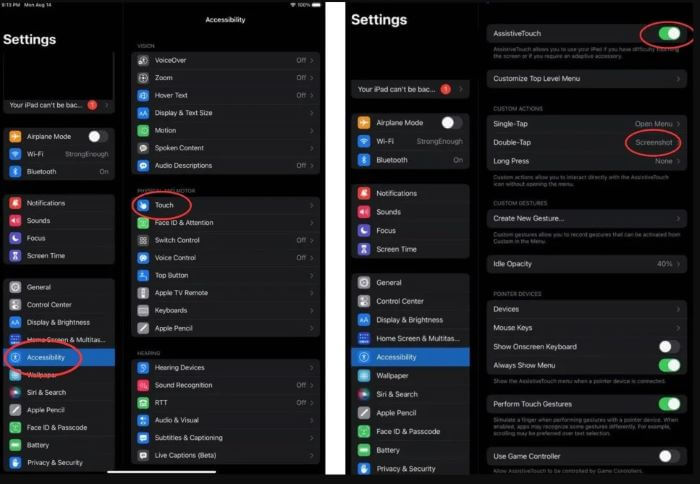
- Go to Settings > Accessibility > Touch and enable AssistiveTouch. This makes an on-screen circular menu button appear.
- Customize the Top Level Menu, click the + sign, and select "Screenshot” to add this action.
- Go to the screen with the content you want to capture. It could be an app, photo, website, etc.
- Tap the AssistiveTouch menu button and select Screenshot. Your screen will briefly flash as the screenshot is taken.
- Find the screenshot image saved in your Photos app like usual. Tap to edit or draw as needed.
How to Screenshot On iPad with an Apple Pencil?
The Apple Pencil is the perfect iPad companion for artists, note-takers, and anyone wanting more precision when interacting with their tablet. Along with drawing and writing by hand, the Pencil can also streamline basic tasks like taking screenshots. Instead of pressing small buttons, just swipe your Pencil from corner to corner - it couldn't be easier!
Steps
- Go to the iPad screen with the content you want to capture - it could be an app, photo, document, or anything viewable.
- Swiftly swipe your Apple Pencil upward starting from the bottom left corner of the screen.
- Your screenshot will save and instantly enter editing mode. Here you can draw, add text, crop, or markup the image.
- Tap Done when finished annotating, then Save to Photos. The screenshot will be saved to your Photos app as usual.

How to Convert a Screenshot to a PDF File?
Whether you want to collaborate on designs, fill out forms, or just need a more universal format, converting iPad screenshots to PDF files is straightforward. Using handy tools built into iPadOS, Windows, and more, you can effortlessly turn simple images into fully editable and shareable PDFs.
Steps
- Take a screenshot on your iPad as usual. Tap to open the preview thumbnail.
- Select the "Full Page" option to save the entire screenshot as a PDF file instead of just an image.
- On a Windows PC, use the PDFgear software to batch convert multiple iPad screenshots to PDF documents with drag-and-drop ease.
- You can also use online converters like the PDFgear website to turn screenshots into PDF files, even from mobile devices.
How to View All Screenshot on iPad Without Knowing?
MoniMaster is a powerful yet easy-to-use monitoring software that lets you secretly view all the screenshots on an iPad. With comprehensive features tailored for Apple devices, MoniMaster ensures complete data access in just a few simple steps.
MoniMaster is one of the most robust iOS monitoring tools available today. Designed for parents, employers, and others needing insights into an iPhone, iPad or iPod Touch, MoniMaster extracts and displays data from various sources.
You can view all screenshots, social media activity, messages, location history, and more. It works by scanning iTunes or iCloud backups from a paired computer. Since MoniMaster doesn't require jailbreaking, it is completely invisible and undetectable.

Key Features of MoniMaster
View all iOS screenshots: Check Camera Roll for every screenshot taken, even if they were deleted.
Social media monitoring: Monitor activity on various social apps, providing insights into messaging and interactions within platforms like WhatsApp, Line, Kik and more.
Messages and call logs: Read text messages, iMessages, phone logs, and voicemail.
Media files: Photos, videos, audio files, notes and more.
Location history: Track movements and places visited.
Browsing history: Record of Safari searches and website visits.
Export reports: Generates complete data reports to export and archive.
Using MoniMaster to View iPad Screenshots
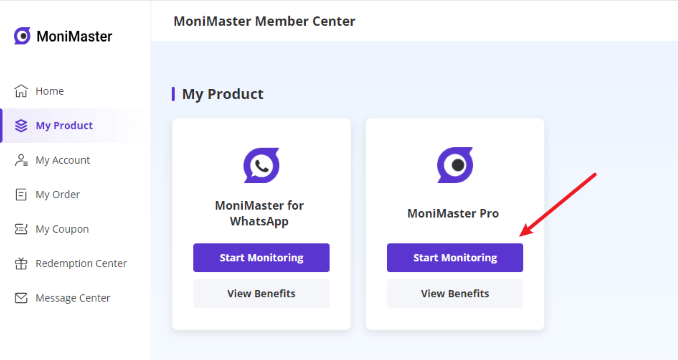
- Create an account at MoniMaster.com and install the app on a paired computer with iTunes backups.
- Connect the target iPad to the computer and verify a successful connection.
- Click "Scan Backup Data” to extract a complete iTunes backup from the iPad.
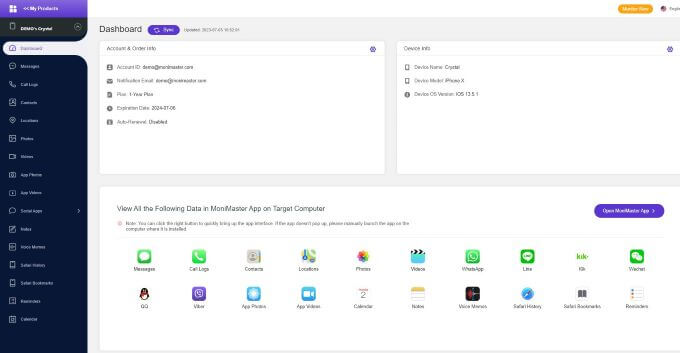
- In the MoniMaster dashboard, select Screenshots under the Photos module to view all iPad screenshots.
- Here you can check timestamps, file names, sizes and preview the screenshots.
With MoniMaster's advanced monitoring capabilities tailored for Apple devices, you can easily view every single screenshot from an iPad or iPhone. It lets you monitor and extract data without complicated setups or needing to jailbreak.
FAQs about Taking Screenshots on an iPad
1.How do I take a screenshot on my iPad with one hand?
If your iPad has a Home button, simultaneously press the top Power button and the Home button to take a one-handed screenshot. For iPads without a Home button, assign the screenshot function to AssistiveTouch, which adds an on-screen Home button you can tap to capture screenshots with just one hand.
2. Can you swipe to screenshot on iPad?
Yes! If you have an Apple Pencil, swiftly swipe up from the bottom left corner of your iPad screen to take a screenshot. Your image will instantly enter editing mode for marking up.
3. How do you split the screen on an iPad with the button?
To activate Split View, first open one app. Then swipe up from the bottom edge to open the dock. Tap and hold the second app icon you want to split until you see the Split View option, then release. Apps will display side-by-side.
Conclusion
When it comes to comprehensively monitoring and managing your family's Apple devices, MoniMaster is an invaluable tool. As covered in this guide, MoniMaster makes accessing all iPad and iPhone screenshots undetectably easy.
With powerful features tailored for iOS, MoniMaster extracts and displays messages, social media activity, web history, locations visited, and more alongside every single screenshot captured. So if you need to responsibly monitor your child's device usage or simply keep digital records, MoniMaster streamlines Apple device oversight through seamless data access and monitoring.

