MoniMaster Support: Monitor devices with others' permission.
In today's fast-paced digital age, visual communication has become an integral part of our interactions. Whether you're sharing a stunning image, capturing a crucial moment, or conveying vital information, knowing how to screenshot effectively is paramount.
In this article, we delve into the art of google pixel screenshot, empowering you to effortlessly preserve and share moments that matter.
How to Take a Screenshot on Pixel 7?
1. Ask Google Assistant to Take a Screenshot?
As we embark on our quest to unravel the mysteries of screenshotting on the Google Pixel 7, let's start with a remarkably convenient method that puts the power of voice commands to use.
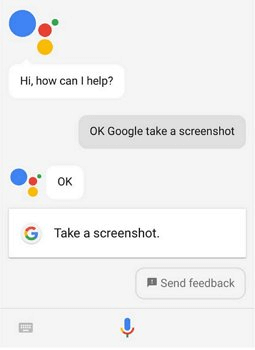
Step 1. Invoke Google Assistant: Begin by summoning Google Assistant using your preferred method—either by saying, "Hey Google," or holding down the power button.
Step 2. Voice Command: Once Google Assistant is at your service, articulate the magic words, "Take A Screenshot." In mere moments, like an obedient digital genie, Google Assistant will capture your screen, freezing the moment for posterity.
Step 3. Access and Share: The screenshot is instantly saved and awaits your command in the notification panel. From here, you can effortlessly share, edit, or store the screenshot according to your needs.
Next, we'll uncover a technique that lets you embrace the tactile world of hardware buttons for your screen capture needs.
2. Physical Buttons
The Google Pixel 7 grants you the power to seize the moment through a seamless integration of physical buttons. Here is how to take a screenshot on pixel 7:
Step 1. The power button is usually positioned on the right side of the device, while the volume down button resides just below.
Step 2. Navigate to the content you wish to capture on your Pixel 7's screen. Ensure that the display showcases precisely what you intend to immortalize.
Step 3. Simultaneously press and hold the power button and the volume down button. Maintain this firm grasp for a brief moment.

The tactile sensation of physically capturing your google pixel screenshot is an embodiment of control and finesse. But our journey doesn't end here next, we'll unravel the secret behind extending your screenshots to encompass an entire virtual landscape.
3. Access the Quick Settings Panel
Efficiency meets innovation as we venture into the world of swift screen capture methods. Here is how to screenshot on google pixel:
Step 1. Open Quick Settings: Begin by swiping down from the top of your Pixel 7's screen to unveil the Quick Settings Panel. This area hosts an array of useful functions, including the screenshot tool.
Step 2. Capture Icon: Within the Quick Settings Panel, keep an eye out for the "Screenshot" icon. It usually appears alongside other quick-access icons.
Step 3. Tap and Capture: Give the "Screenshot" icon a gentle tap. Instantly, your Pixel 7 will respond with a swift screen capture, preserving the desired content.
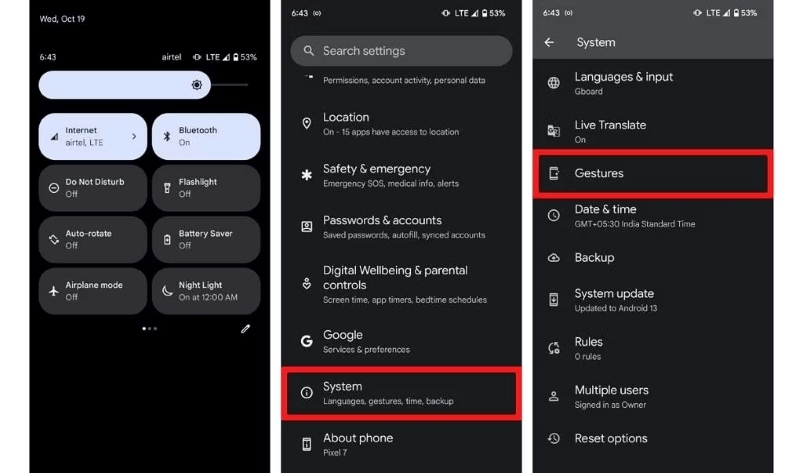
Harness the power of quick accessibility as you effortlessly command your phone to capture pixel 6 screenshot moments at the tap of an icon.
How to Take a Scrolling Screenshot on Google Pixel?
Gone are the days when a single screen capture could tell the entire story. The Google Pixel introduces an ingenious feature that enables you to capture elongated content seamlessly. Here is how to take a scrolling pixel screenshot:
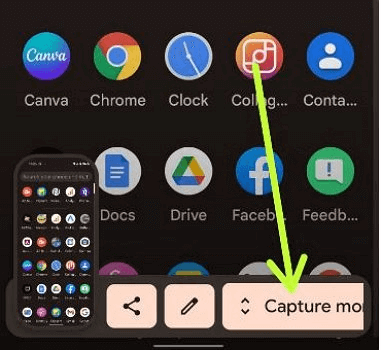
Step 1. Initiate a Screenshot: Begin by employing any of the previously mentioned methods to capture a standard screenshot. Utilize the physical buttons, Google Assistant, or the Quick Settings Panel to capture the initial segment of your desired content.
Step 2. Tap "Scrolling Screenshot": Once the initial screenshot is captured, a notification will appear in the notification panel. Select the "Scrolling Screenshot" option to commence the procedure.
Step 3. Scroll with Precision: As you scroll through the content, the Pixel 7 will cleverly capture each successive segment, seamlessly stitching them together.
As we proceed, let's uncover another dimension of visual communication: screen recordings.
How to Take a Screen Recording on Pixel 7?
Ever wished you could capture dynamic interactions on your Google Pixel 7 and share them as a vivid video? Here is how to take screen recording on Pixel 7:
Step 1. Access Screen Recording: Swipe down the notification shade and locate the "Screen Recording" option in the Quick Settings Panel. Tap on it to open the screen recording interface.
Step 2. Toggle Settings (Optional): Before recording, tailor your preferences. You can opt to capture audio, show touches, and select the video quality. Adjust these settings to match your recording needs.
Step 3. Start Recording: Once configured, hit the "Start" button. Your Pixel 7 will commence recording everything displayed on the screen.
As we venture forward, let's explore the intriguing realm of capturing screenshots on others' phones using your Google Pixel.
How to Take Google Pixel Screenshot on Other's Phones?
In a world of increasing digital interconnectedness, the ability to capture screenshots on other devices can offer a myriad of benefits, whether for collaborative projects, troubleshooting, or monitoring. Enter MoniMaster — a versatile solution designed to empower you with a comprehensive set of features, enabling you to take screenshots and delve into various aspects of the target device.
Features of MoniMaster:
Capture Screenshots:
MoniMaster allows you to remotely take screenshots of the target Google Pixel's screen, ensuring you can visually capture important moments or critical information.
Record Phone Screen:
MoniMaster facilitates screen recording on the target device, letting you document actions, conversations, or activities for reference.
Gain insights into the device's environment by discreetly listening to its surroundings, helping you stay informed about ongoing activities.
Track Location:
Stay updated on the device's whereabouts through GPS tracking, a valuable tool to track someones phone without them knowing.
Monitor All Phone Files & Social Media:
MoniMaster grants you access to various phone files and social media activities, offering a comprehensive overview of the device user's digital interactions.
With MoniMaster Pro for Android, you gain a holistic approach to remote monitoring and screenshot capture, giving you insights and control over the target device's activities. It's a powerful tool for various scenarios, from parental monitoring to professional collaboration.
How to Use MoniMaster Pro for Android?
Step 1. Create an Account:
To sign up, click "Sign Up" and use a valid email. Purchase a license for full access to the Android monitoring app. You'll be directed to the "My Products" page.
Step 2. Install and Set Up:
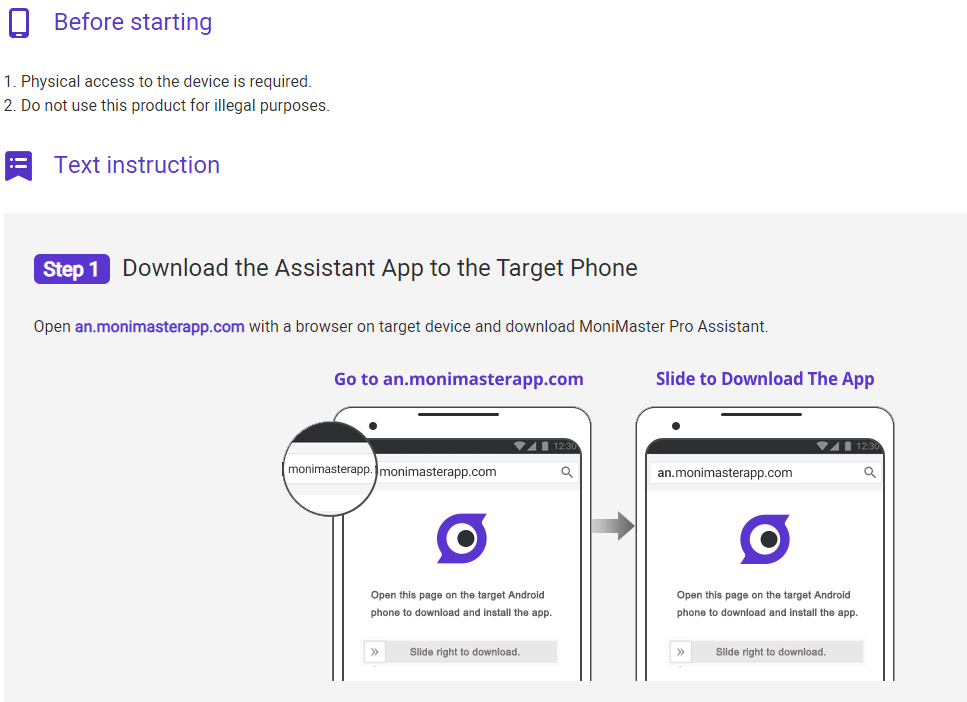
Begin by downloading and installing the MoniMaster app on the target Android device. Follow the straightforward setup instructions to link the device to your MoniMaster account.
Step 3. Initiate Screenshot Capture:
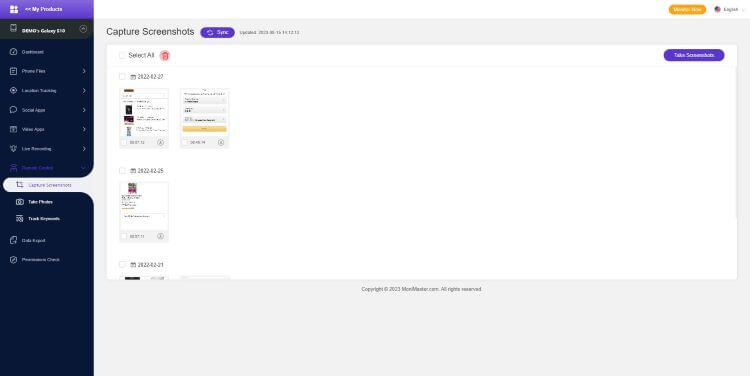
To take a screenshot on the target Google Pixel, access the MoniMaster dashboard from your device. Navigate to the "Capture Screenshots" section and trigger a screenshot command remotely.
FAQs about Google Pixel Screenshot
1. How do you screenshot on Google Pixel without button?
Utilize Google Assistant by saying "Hey Google, take a screenshot." Alternatively, use the Quick Settings Panel's "Screenshot" icon for a button-free capture.
2. Why can't I screenshot on Google Pixel?
If you're facing issues, ensure your device is updated, and try restarting it. If problems persist, seek technical assistance, or consider alternate methods.
3. How do I take a screenshot without swiping?
Employ hardware buttons or Google Assistant. Press and hold the power button and volume down simultaneously or ask Google Assistant to capture the screen.
Conclusion
Master the art of screen capture with Google Pixel 7 and beyond. From physical buttons to Google Assistant, we've explored seamless methods for screenshots. Dive into scrolling screenshots and dynamic screen recordings. For advanced monitoring, consider MoniMaster —an Android solution offering screenshot capture, surroundings listening, location tracking, and more. Elevate your digital experience today.


